In this post I'll show a way to configure a basic GitHub Action workflow in order to build a Xaramin.Forms application and create the APK, only Android at the moment.
First of all, the workflow:
                            name: Build


                            on:

                              push:

                                branches: [ master ]

                              pull_request:

                                branches: [ master ]


                            jobs:

                              # Build App

                              build:

                                runs-on: windows-latest


                                env:

                                  SERVICE_APP_KEY: ${{ secrets.SERVICE_APP_KEY }}


                                steps:

                                  - uses: actions/checkout@v2


                                  - name: Setup MSBuild

                                    uses: microsoft/setup-msbuild@v1.0.0


                                  - name: Build Solution

                                    run: msbuild ./MyApplication.sln /restore /p:Configuration=Release


                                  - name: Create and Sign the APK

                                    run: msbuild MyApplication\MyApplication.Android\MyApplication.Android.csproj /t:SignAndroidPackage /p:Configuration=Release /p:OutputPath=bin\Release\


                                  - name: Upload artifact

                                    uses: actions/upload-artifact@v2

                                    with:

                                      name: MyApplication.apk

                                      path: MyApplication\MyApplication.Android\bin\Release\com.companyname.myapplication-Signed.apk
Step by step
The first lines are self-explanatory so I'll jump to the build section.
                            build:

                              runs-on: windows-latest
This will configure a Windows machine and all steps for this job will run in this environment. The default shell will be a PowerShell, so we can run scripts in this language.
                            env:

                              SERVICE_APP_KEY: ${{ secrets.SERVICE_APP_KEY }}
With this line we create an environment variable, SERVICE_APP_KEY with the content of the GitHub secret secrets.SERVICE_APP_KEY. The variables created in an upper level can be accessed by its children elements but a variable created in a step level, for example, cannot be accessed from other step or a parent element.
A secret in GitHub is a piece of encrypted information that belongs to the repository. To create a secret go to your repository Settings -> Secrets.
If you try to print the value of a secret during the build process you will only see something like: SERVICE_APP_KEY: ****
Now let's explain the steps.
                            steps:

                              - uses: actions/checkout@v2
The first step is the checkout. This action will download all the code to the current machine.
                            - name: Setup MSBuild

                              uses: microsoft/setup-msbuild@v1.0.0
The next steps is to use the action microsoft/setup-msbuild@v1.0.0 in order to configure the environment that allow us to use the msbuild tool.
                            - name: Build Solution

                              run: msbuild ./MyApplication.sln /restore /p:Configuration=Release
Build the solution in Release mode.
                            - name: Create and Sign the APK

                              run: msbuild MyApplication\MyApplication.Android\MyApplication.Android.csproj /t:SignAndroidPackage /p:Configuration=Release /p:OutputPath=bin\Release\
In order to create and sign the package we will execute the msbuild command over the Android project with the target /t:SignAndroidPackage. The configuration should be Release and the generated .apk file will be located in {project_folder}\bin\Release
The name of the file will be com.companyname.myapplication-Signed.apk. The default name of the package is com.companyname.myapplication, you can change it in the AndroidManifest.xml file or in the properties of the Android project in Visual Studio.
This process attach the -Signed suffix to the name.
                            - name: Upload artifact

                              uses: actions/upload-artifact@v2

                              with:

                                name: MyApplication.apk

                                path: MyApplication\MyApplication.Android\bin\Release\com.companyname.myapplication-Signed.apk
The last step is to make available the artifact to be downloaded. We will use the action actions/upload-artifact@v2 with the parameters name as the name of the artifact, and the path, the path where the package is located.
How to manage the secret keys
The hardcoded keys are not a good practice ;) A better solution could be create an environment variable in your local system, but, how to access from code? One approach I follow is to create a class to manage the secrets and populate it with placeholders, something like:
                            public static class Secrets{

                                  public static string ServiceID => "#KEY1#"

                                  public static string OtherKey => "#KEY2#"

                            }
To replace the placeholders by the valid keys I have a PowerShell script that runs in the pre-build event on Visual Studio.
                            function Replace-Text{

                              <#

                              .SYNOPSIS

                                Replace the $placeholder value by $key value in $file

                              .PARAMETER $file

                                File to replace values. Mandatory

                              .PARAMETER $placeholder

                                Value to be replaced. Mandatory

                              .PARAMETER $key

                                The new value to replace the $placeholder. Mandatory

                              .EXAMPLE

                                Replace-Text file_path "#TEXT TO REPLACE#" "KEY VALUE"

                              #>

                              Param(

                                    [Parameter(Mandatory=$true)]

                                    [string]$file,

                                    [Parameter(Mandatory=$true)]

                                    [string]$placeholder,

                                    [Parameter(Mandatory=$true)]

                                    [string]$key

                              )

                              ((Get-Content -path $file -Raw) -replace $placeholder, $key) | Set-Content -Path $file

                            }


                            $file = $args[0]

                            $placeholder = $args[1]

                            $key_value = $args[2]


                            Replace-Text $file $placeholder $key_value
This script have three parameters:
- the $file where the placeholder are
- the $placeholder to be replaced
- the $key_value from the environment variable
This script is called from the Pre-build event command line. Project properties -> Build Events:
                            powershell.exe -ExecutionPolicy Unrestricted $(ProjectDir)..\..\Tools\replace-keys-script.ps1 $(ProjectDir)Secrets.cs "`#KEY1`#" $env:SERVICE_APP_KEY


                            powershell.exe -ExecutionPolicy Unrestricted $(ProjectDir)..\..\Tools\replace-keys-script.ps1 $(ProjectDir)Secrets.cs "`#KEY2`#" $env:OTHER_KEY
If the placeholder has # characters like #INSERT_KEY_HERE# they must be escaped with grave-accents: "`#INSERT_KEY_HERE`#" in order to escape the comment symbol.
Let me show the folder structure:
                            /

                            |- Solution.sln

                            |- Project/

                            |- Project.Android/

                            |- Tools/

                                |- replace-keys-script.ps1
Why to use $(ProjectDir)..\..\Tools instead of $(SolutionDir)Tools? Because $(SolutionDir) does not works on GitHub Actions for wharever reason.
As you may notice, this process change the content of the files and Git wil mark them. To fix this I do a checkout for all files in the Post-build event:
git checkout $(ProjectDir)Secrets.cs
After the build process the application will work with correct values and the code remains intact.
The only thing we need to do in GitHub is to create the secrets we need for the keys and create the environment variables in the workflow with the same name as we have in out system.
In this post I'll show how train a model with Detectron2 with a custom dataset and then apply it detect my cats in a picture or video.
Table of content
- Install Detectron2
- Create your own dataset
- Steps to annotate an image
- Training process
- Data loader
- Inference
- References
Install Detectron2
I use the docker version of Detectron2 that installs all the requirements in a few steps:
1. Take the required files, Dockerfile, Dockerfile-circleci, docker-compose.yml from https://github.com/facebookresearch/detectron2/tree/master/docker
2. Create and run the container with the command:
docker-compose run --volume=/local/path/to/save/your/files:/tmp:rw detectron2
Note
The installed version of
Pillow package is 7.0.0, this could fail when you try to train your model showing an error similiar to:
                                from PIL import Image, ImageOps, ImageEnhance, PILLOW_VERSION

                            ImportError: cannot import name 'PILLOW_VERSION'
The solution is to downgrade the version to 6.2.2:
pip install --user Pillow==6.2.2
Check the installation guide to install Detectron2 using other methods.
Create your own dataset
The first (and most tedious) step is to annotate the images. For this examples I will use a set of images of my cats, Blacky and Niche:
and I'll use
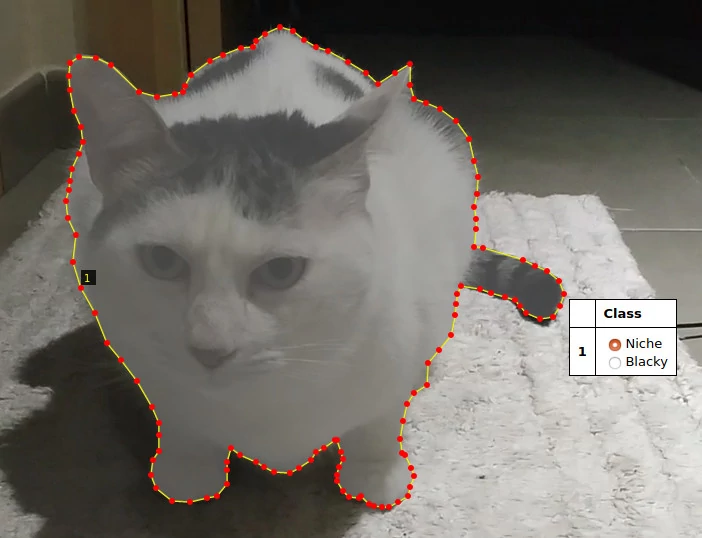
VIA 2.0.8, it's an easy tool to make the annotations. This is an example of how an annotation looks like:
Steps to annotate an image
Note
- The instructions below are for VIA tool, if you are using a different tool, then jump to the next section.
- Follow this process twice, once for training images, another for validation images.
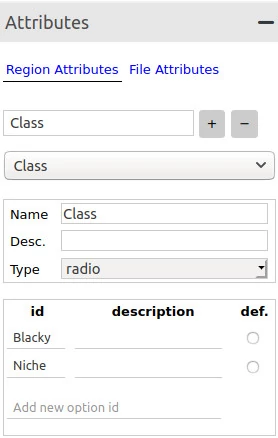
Before start to annotating the images you must create a region attribute named Class, you can change the name if you want, in order to choose which region your are drawing.
Looking the image above, follow these steps:
1. Expand the Attributes panel.
2. Type the attribute name Class on textbox and click on plus symbol.
3. Change the Type of the attribute from text to radio.
4. Write all classes available for the dataset, Blacky and Niche in my case, in the id field.
Next, the basics steps to annotate the images:
1. Add the images to the project clicking on the Add Files button in the Project panel.
2. Select one image and start drawing the region using the Poligon region shape.
3. To apply the changes press Enter and the region will be saved.
4. Click outside of the region, click again on the region and select the class you are annotating.
Sometimes you will need to scroll down / right to see the option list
5. Once all images are annotated, export the annotations as json. Go
Annotation menu, then
Export Annotations (as json).
The json file will contains a section by image similar to this one:
                            "frame80.jpg214814": {

                              "filename": "frame80.jpg",

                              "size": 214814,

                              "regions": [

                                {

                                  "shape_attributes": {

                                    "name": "polygon",

                                    "all_points_x": [

                                      1096,

                                      1016,

                                      947,

                                      ...

                                    ],

                                    "all_points_y": [

                                      116,

                                      191,

                                      231,

                                      ...

                                    ]

                                  },

                                  "region_attributes": {

                                    Class": "Blacky"

                                  }

                                }

                              ],

                              "file_attributes": {}

                            }

                            ...
Training process
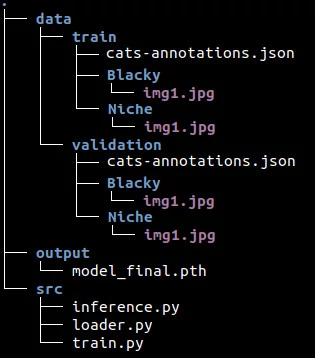
Before to start to explain the code, let me show the folder structure in order to have an idea of where are the code, the data and all this stuff.
The data folder contains two folders, train and validation, which contain one folder per class (of course, there are more than one image in the class folder). Also, the train and validation folders have its respective annotation files. The src folder contains the code sepated in different files.
Ok, now we are ready to write the code. First things first, we need to import the functions required from detectron2.
                            # train.py


                            import os


                            from detectron2.data import MetadataCatalog, DatasetCatalog

                            from detectron2.config import get_cfg

                            from detectron2 import model_zoo

                            from detectron2.engine import DefaultTrainer

                            from loader import get_data_dicts
Next, we'll register both datasets, train and validation, and indicate the name of the classes that we are using.
                            for d in ["train", "val"]:

                              DatasetCatalog.register("cats_" + d, lambda d=d: get_data_dicts("../data/" + d))

                              MetadataCatalog.get("cats_" + d).set(thing_classes=["Blacky", "Niche"])


                            cats_metadata = MetadataCatalog.get("cats_train")
The DatasetCatalog.register function expects two parameters, the name of the dataset, and the function to get the data.
With MetadataCatalog we specify which classes are present in the dataset using the attribute thing_classes. To know more about the metadata check the documentation.
Now let's configure the model:
                            cfg = get_cfg()

                            cfg.merge_from_file(model_zoo.get_config_file("COCO-InstanceSegmentation/mask_rcnn_R_50_FPN_3x.yaml"))

                            cfg.DATASETS.TRAIN = ("cats_train",)

                            cfg.DATASETS.TEST = ()

                            cfg.DATALOADER.NUM_WORKERS = 4

                            cfg.MODEL.WEIGHTS = "detectron2://COCO-InstanceSegmentation/mask_rcnn_R_50_FPN_3x/137849600/model_final_f10217.pkl"

                            cfg.SOLVER.IMS_PER_BATCH = 2

                            cfg.SOLVER.BASE_LR = 0.00025

                            cfg.SOLVER.MAX_ITER = 700

                            cfg.MODEL.ROI_HEADS.BATCH_SIZE_PER_IMAGE = 128

                            cfg.MODEL.ROI_HEADS.NUM_CLASSES = 2
- get_cfg(): returns an instance of CfgNode class that allow us to modify the configuration of the model.
- cfg.merge_from_file: we use this to apply the original configuration from mask_rcnn_R_50_FPN_3x model to our configuration.
- cfg.DATASETS.TRAIN: This is the list of dataset names for training. Important to note the comma at the end.
- cfg.DATASETS.TEST: This remains empty for the training purposes.
- cfg.DATALOADER.NUM_WORKERS: Number of data loading threads.
- cfg.MODEL.WEIGHTS: Pick the weights from mask_rcnn_R_50_FPN_3x model.
- cfg.SOLVER.IMS_PER_BATCH: Number of images per batch.
- cfg.SOLVER.BASE_LR: Learning rate.
- cfg.SOLVER.MAX_ITER: Total iterations (Detectron2 don't use epochs).
- cfg.MODEL.ROI_HEADS.BATCH_SIZE_PER_IMAGE: Indicate the number of ROI's (Region of Interest) per training minibatch.
- cfg.MODEL.ROI_HEADS.NUM_CLASSES: Number of classes.
Basically what we are doing here is to get configuration from an existing model, mask_rcnn_R_50_FPN_3x, then we overwrite some of the values like learning rate, iterations, etc...
Check the documentation about the configuration to know all available options that you can change.
And finally it's time to call the training process:
                            os.makedirs(cfg.OUTPUT_DIR, exist_ok=True)

                            trainer = DefaultTrainer(cfg)

                            trainer.resume_or_load(resume=False)

                            trainer.train()
Data loader
Now it's time to implement the function to let Detectron2 know how to obtain the data from the dataset that we registered before with:
DatasetCatalog.register("cats_" + d, lambda d=d: get_data_dicts("../data/" + d))
The code of loader.py is pretty similar to the function shown in the Colab notebook
                            # loader.py


                            def get_data_dicts(img_dir):

                              classes = ["Blacky", "Niche"]


                              json_file = os.path.join(img_dir, "cats-annotations.json")

                              with open(json_file) as f:

                                imgs_anns = json.load(f)


                              dataset_dicts = []

                              for idx, v in enumerate(imgs_anns.values()):

                                record = {}


                                if "regions" not in v: continue


                                # Extract info from regions

                                annos = v["regions"]

                                objs = []


                                for anno in annos:

                                  shape_attr = anno["shape_attributes"]

                                  px = shape_attr["all_points_x"]

                                  py = shape_attr["all_points_y"]

                                  poly = [(x + 0.5, y + 0.5) for x, y in zip(px, py)]

                                  poly = [p for x in poly for p in x]


                                  region_attr = anno["region_attributes"]

                                  current_class = region_attr["Class"]

                                  obj = {

                                    "bbox": [np.min(px), np.min(py), np.max(px), np.max(py)],

                                    "bbox_mode": BoxMode.XYXY_ABS,

                                    "segmentation": [poly],

                                    "category_id": classes.index(current_class),

                                    "iscrowd": 0

                                  }

                                  objs.append(obj)


                                record["annotations"] = objs


                                # Get info of the image

                                filename = os.path.join(img_dir, current_class, v["filename"])

                                height, width = cv2.imread(filename).shape[:2]


                                record["file_name"] = filename

                                record["image_id"] = idx

                                record["height"] = height

                                record["width"] = width


                                dataset_dicts.append(record)

                              return dataset_dicts
The function loops through all annotations in the json file and extract the information related with the region, category, etc... of the image.
The annotation itself is represented by the dictionary obj that contains some specific keys:
- bbox: list of 4 numbers representing the bounding box of the instance.
- bbox_mode: the format of the bbox.
- category_id: number that represents the category label.
- iscrowd: 0 or 1. Whether the instance is labeled as COCO's format.
Also, some extra information is saved in the record dictionary:
- file_name: the fullpath of the image.
- image_id: a unique id to identify the image.
- height: self explanatory.
- width: self explanatory.
To know more about of the dictionary check the documentation.
Inference
It's time to do some predictions and we start with the imports:
                            # inference.py


                            import os

                            import random

                            import cv2


                            from detectron2.config import get_cfg

                            from detectron2 import model_zoo

                            from detectron2.engine import DefaultPredictor

                            from detectron2.utils.visualizer import Visualizer, ColorMode

                            from detectron2.data import MetadataCatalog

                            from loader import get_data_dicts
For inference we use a few different functions: DefaultPredictor, Visualizer and ColorMode.
Next, we configure the model as we did on the training process, then create the predictor:
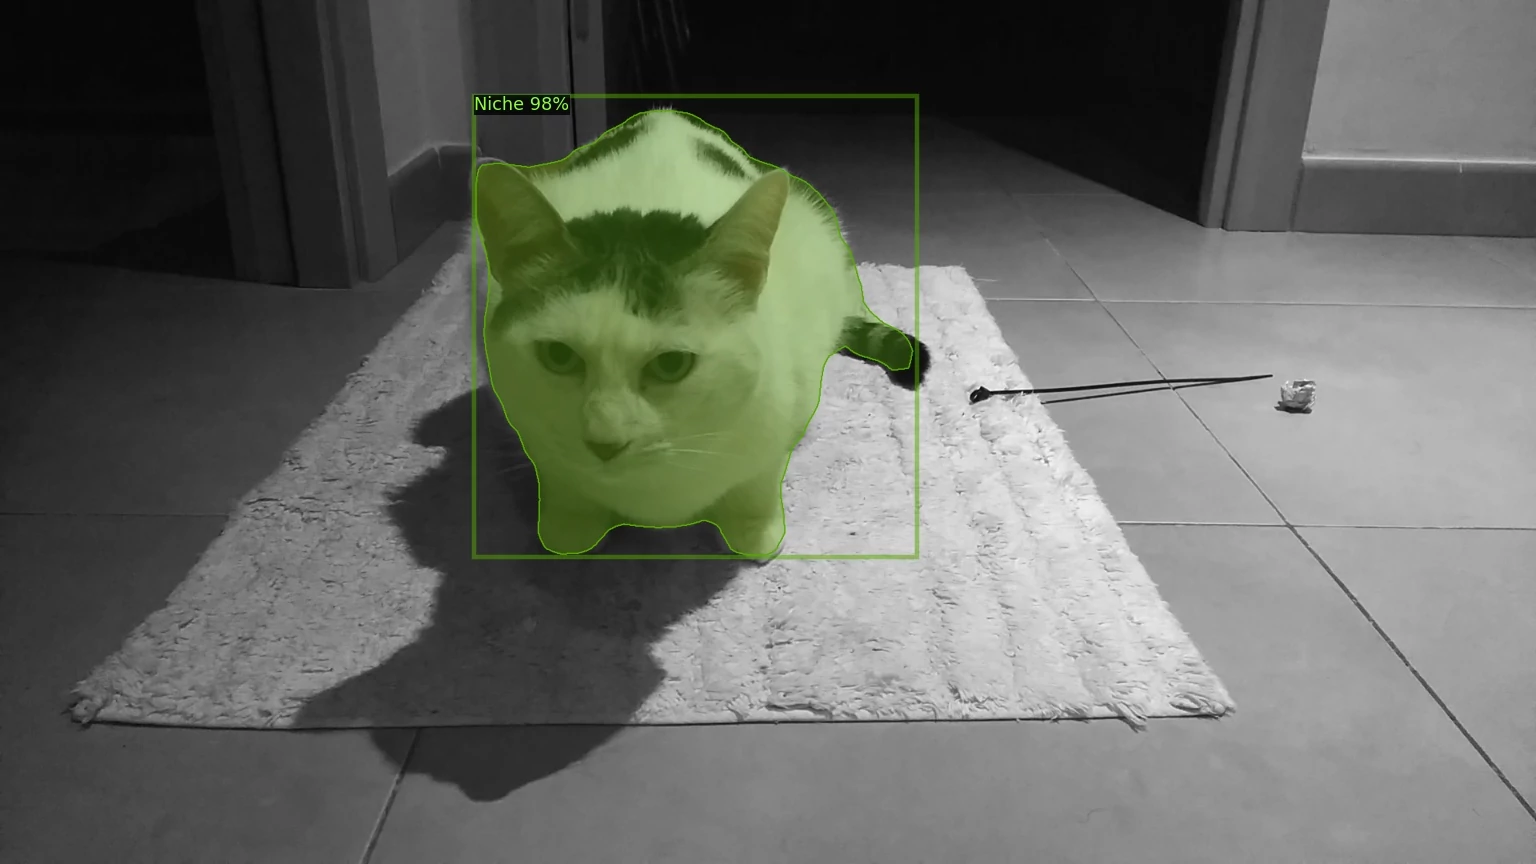
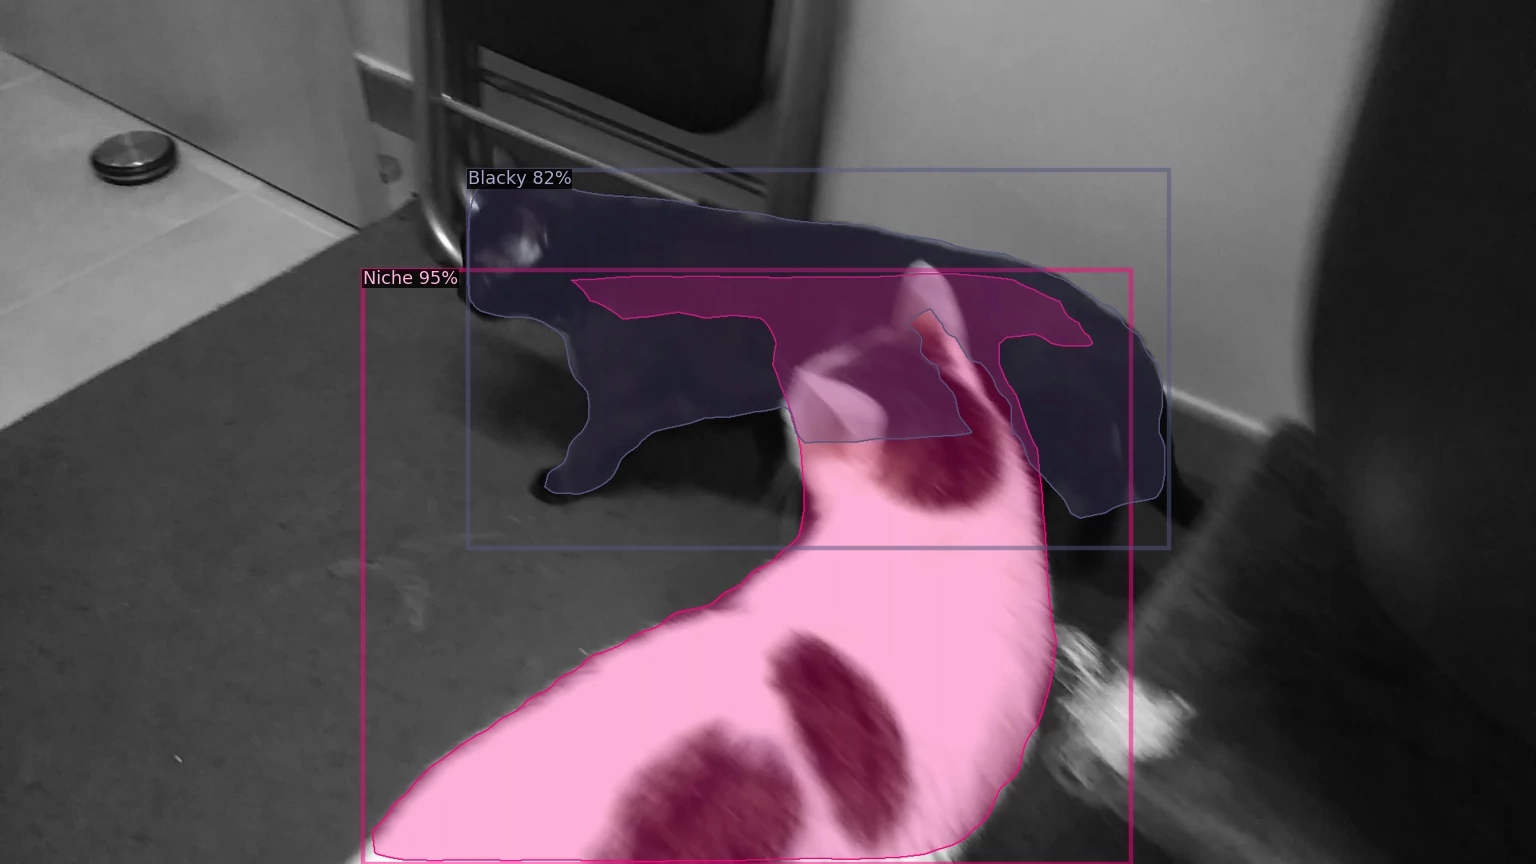
                            classes = ["Blacky", "Niche"]


                            cfg = get_cfg()

                            cfg.merge_from_file(model_zoo.get_config_file("COCO-InstanceSegmentation/mask_rcnn_R_50_FPN_3x.yaml"))

                            cfg.DATASETS.TEST = ("cats_val",)

                            cfg.MODEL.WEIGHTS = os.path.join(cfg.OUTPUT_DIR, "model_final.pth")

                            cfg.MODEL.ROI_HEADS.NUM_CLASSES = 2

                            cfg.MODEL.ROI_HEADS.SCORE_THRESH_TEST = 0.7


                            predictor = DefaultPredictor(cfg)
This configuration is similar to the configuration we used in the training but this time the WEIGHTS come from our trained model model_final.pth.
                            dataset_dicts = get_data_dicts("../data/validation")


                            for idx, d in enumerate(random.sample(dataset_dicts, 3)):

                              im = cv2.imread(d["file_name"])

                              outputs = predictor(im)


                              v = Visualizer(im[:, :, ::-1],

                                metadata = MetadataCatalog.get("cats_val").set(

                                  thing_classes=classes,

                                  thing_colors=[(177, 205, 223), (223, 205, 177)]),

                                scale = 0.8,

                                instance_mode = ColorMode.IMAGE_BW

                              )


                              pred_class = (outputs['instances'].pred_classes).detach()[0]

                              pred_score = (outputs['instances'].scores).detach()[0]


                              print(f"File: {d['file_name']}")

                              print(f"--> Class: {classes[pred_class]}, {pred_score * 100:.2f}%")


                              # Save image predictions

                              v = v.draw_instance_predictions(outputs["instances"].to("cpu"))

                              image_name = f"inference_{idx}.jpg"

                              cv2.imwrite(image_name, v.get_image()[:, :, ::-1])
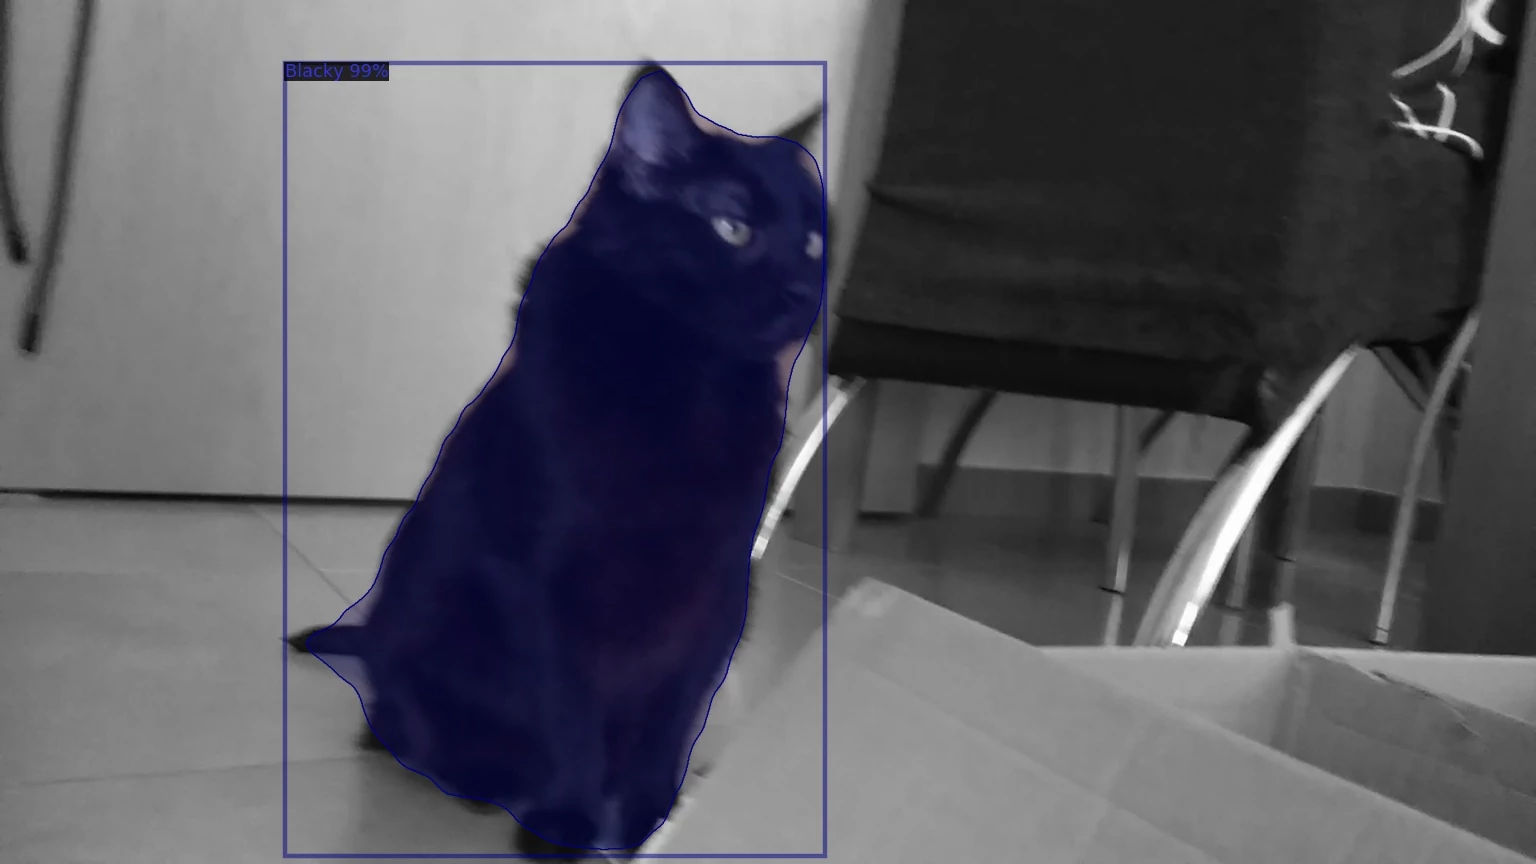
To make the predicitions we use 3 random images from the validation dataset.
The predictor receive the image in format BGR, the same format that cv2 returns when reads the image.
Once we have the predictions then we create and configure the Visualizer that we'll use to show the regions predicted over the original image.
The Visualizer accepts as the first parameter the original image but this time in RGB format, that's why we have to reverse the array that cv2 returns when reads the image.
The second parameter is the metadata, which in this case consists of the name of the classes, Blacky and Niche, and the colors applied to the regions of each class.
The ColorMode.IMAGE_BW value is used to remove the color of unsegmented pixels (the pixels that don't belong to the predicted region).
At the end we apply the regions predicted over the original image with v.draw_instance_predictions(outputs["instances"].to("cpu"))
In this case I save the image on disk because I don't have access to XServer from inside Docker, so OpenCV cannot open any window to show the image. In case we worked from our local system we could use:
                            v = v.draw_instance_predictions(outputs["instances"].to("cpu"))

                            cv2.imshow(v.get_image()[:, :, ::-1])
Check the test.py file in the repository to know how to make inference in a video. Spoiler alert: predicting every frame xD.
1. Create an asp.net core project as usual and check if you have access using HTTPS.
dotnet new web -o Sample
cd Sample
dotnet restore
dotnet run
1.1 Navigate to
https://localhost:5001. Can you read the message
Hello World!? Congrats, you can stop reading this guide. If Firefox shows you a
Secure Connection Failed message or you have an error message in console like this:
                            dbug: HttpsConnectionAdapter[1]

                            Failed to authenticate HTTPS connection.

                            System.Security.Authentication.AuthenticationException: Authentication failed, see inner exception. ---> Interop+Crypto+OpenSslCryptographicException: error:2006D002:BIO routines:BIO_new_file:system lib
Keep reading.
2. Installca-certificates and openssl packages
sudo apt-get install ca-certificates openssl
3. Genereate the .pfx certificate with dotnet command [1]
dotnet dev-certs https -ep ${HOME}/.aspnet/https/aspnetapp.pfx -p crypticpassword
4. Extract the .crt file [2]
cd ${HOME}/.aspnet/https/
openssl pkcs12 -in aspnetapp.pfx -nocerts -out aspnetapp.pfx
openssl pkcs12 -in aspnetapp.pfx -clcerts -nokeys -out aspnetapp.crt
5. Copy the .crt file to the certificates location [3]
sudo cp aspnetapp.crt /usr/local/share/ca-certificates/
6. Change the permissions to allow to read the certificate [4]
sudo chmod +r /usr/local/share/ca-certificates/*
7. Run the application again and check the https address
dotnet run
Navigate to https://localhost:5001. If you have any error, you can check the links below to know more about each step.
This guide will work with three project, the Nuget Server project, the Nuget Package project that contains a simple library and a Sample project to use the package created.
Nuget Server project
1. Install the IIS server if you don't have it yet.
2. Create a new site, NugetServer for example, to host the server.
3. Configure the port 8080 if its free, or any other as you wish.
From Visual Studio:
1. Create an ASP.NET web project with the Empty template.
2. Install the Nuget.Server package.
Note
Check the web.config and be sure that the targetFramework version from httpRuntime entry is the same that targetFramework from compilation entry
If you have more than once compilation entry then remove the different one.
3. Publish the project into your IIS server with the options below:
Note
To publish the project on IIS you need to run Visual Studio as Administrator;
Connection:
                                    - Publish method: Web deploy

                                    - Server: localhost (no port number)

                                    - Site name: NugetServer (site name in IIS)

                                    - Destination URL: http://localhost:8080 (site address)
Settings:
                                    - Configuration: Release

                                    - Expand File Publish Options and check Exclude file from the App_Data folder
Nuget Package project
In Visual Studio create a new Class Library project and add a simple method that returns whatever value in order to test it later in the Sample project.
Download Nuget.exe from https://www.nuget.org/downloads and run the next command where the .csproj is located in order to create the .nuspec file.
nuget.exe spec
Note
If you have an error like
Unexpected token 'spec' in expression or statement. + CategoryInfo : ParserError: (:) [], ParentContainsErrorRecordException + FullyQualifiedErrorId : UnexpectedToken
Try to copy the nuget.exe to the same folder that .csproj file and run it from there.
Open the .nuspec file created and complete all information.
Build the project in Release mode and generate the nuget package with:
nuget.exe pack Project_name.csproj -Prop Configuration=Release
Note
The previous command could fail if you don't fill correctly the .nuspec file.
Finally copy the .nupkg file created into the Packages folder of the NugetServer.
Sample project
Create a new Console App project and configure the Nuget repository.
Tools -> Nuget Package Manager -> Package Manager Settings -> Package Sources
Add a new one with this options:
                                        Name: Local Server

                                        Source: http://localhost:8080/nuget

                                        Click on Update then Ok
Note
If there is an error getting the list of packages from local server like the image below

check the Output console to know more about the error.
[Local Server] The V2 feed at 'http://localhost:8080/Search()?$filter=IsLatestVersion&searchTerm=''&targetFramework='net47'&includePrerelease=false&$skip=0&$top=26&semVerLevel=2.0.0' returned an unexpected status code '500 Internal Server Error'.
In this case the error 500 means that the sever cannot server the packages and is related with the note in the
Nuget Server project section.
If all works correctly then you have access to your package and all its classes and methods.
Extra: Automatise the package creation
This is an alternative version of the Nuget Package project. Instead of create the package and copy it to the server manually, these tasks are performed by a script when you build the project.
Start in the same way creating the Class Library project and create a folder Tools in the solution folder then copy the nuget.exe file into it.
Create a Post-Build event with the content below to create the nuget package automatically and be moved to the Packages folder of the Nuget server
                                    "$(SolutionDir)Tools\nuget.exe" pack "$(ProjectPath)" -Prop Configuration=Release


                                    if exist "$(TargetDir)*.nupkg" (

                                      move "$(TargetDir)*.nupkg" "D:\path_to_server\Packages"

                                    )
Be sure that the version of the library has been incremented after the build. I use
Automatic Versions
Now if you build several times you can check in the Sample project the latest version available for download.
Note
If you don't see the new versions available that means the new nuget packages has not been generated.
You can check all versions available of the package in the Packages/package_name folder on Nuget Sever. If there is only one, means that something gone wrong.
If you are reusing the Nuget Package Sample project be sure to remove the .nuspec and .nupkg files from project folder because you don't needed now also remove the .nupkg file from the Nuget Server that you copied manually.


